Security Pilot
Security Pilot is a comprehensive WordPress security plugin that hardens your site against common attacks and vulnerabilities. It applies industry-standard HTTP security headers, protects the login page from brute-force attacks, blocks malicious requests with a built-in firewall, and restricts sensitive REST API endpoints.
Unlike bloated security suites, Security Pilot is lightweight and modular: enable only the protections you need. Every module can be toggled independently, and all settings are managed from a single, clean admin page under Settings → Security Pilot.
Highlights
- HTTP security headers — HSTS, Content-Security-Policy,
X-Frame-Options, X-Content-Type-Options, Referrer-Policy,
Permissions-Policy, X-XSS-Protection and removal of the
X-Powered-Byheader. - Login protection — configurable rate limiting, temporary lockouts and permanent bans for repeat offenders, with optional email alerts.
- Request firewall — pattern-based detection of SQL injection, cross-site scripting (XSS), path traversal, remote file inclusion (RFI) and command injection.
- REST API protection — block unauthorized access to sensitive
endpoint groups such as
/wp/v2/users, WooCommerce, Jetpack,wp-site-health, Divi Builder and Elementor. - WordPress hardening — disable the file editor and XML-RPC, suppress pingbacks and trackbacks, hide the WordPress version, remove the RSD link and the Windows Live Writer manifest.
- Security audit — scan for outdated plugins, outdated themes and inactive plugins that increase your attack surface.
- Attack logging & IP management — view recent blocked requests and manage blocklists or allowlists from the admin interface.
Requirements
Security Pilot is designed for modern, self-hosted WordPress sites.
- A working WordPress installation with administrator access.
- A PHP version supported by your current WordPress release.
- HTTPS is strongly recommended. The HSTS header should only be enabled when your site is reachable over TLS on every URL, including subdomains you want covered.
- Sufficient permission to modify HTTP response headers. On most managed hosts this works out of the box; in front of some reverse proxies or CDNs the headers may need to be allowed through at the edge.
There are no external services to configure and no API keys are required. Settings, logs and blocklists are stored in your own WordPress database.
Installation
- Download the Security Pilot plugin ZIP.
- In WordPress, open Plugins → Add New → Upload Plugin.
- Choose the ZIP file and select Install Now.
- Click Activate Plugin when the upload completes.
- Open Settings → Security Pilot to review the modules.
After activation, no protection is forcibly enabled — every module starts in a known state and can be toggled individually. This makes it safe to install on a production site and to introduce hardening in small, reversible steps.
Configuration
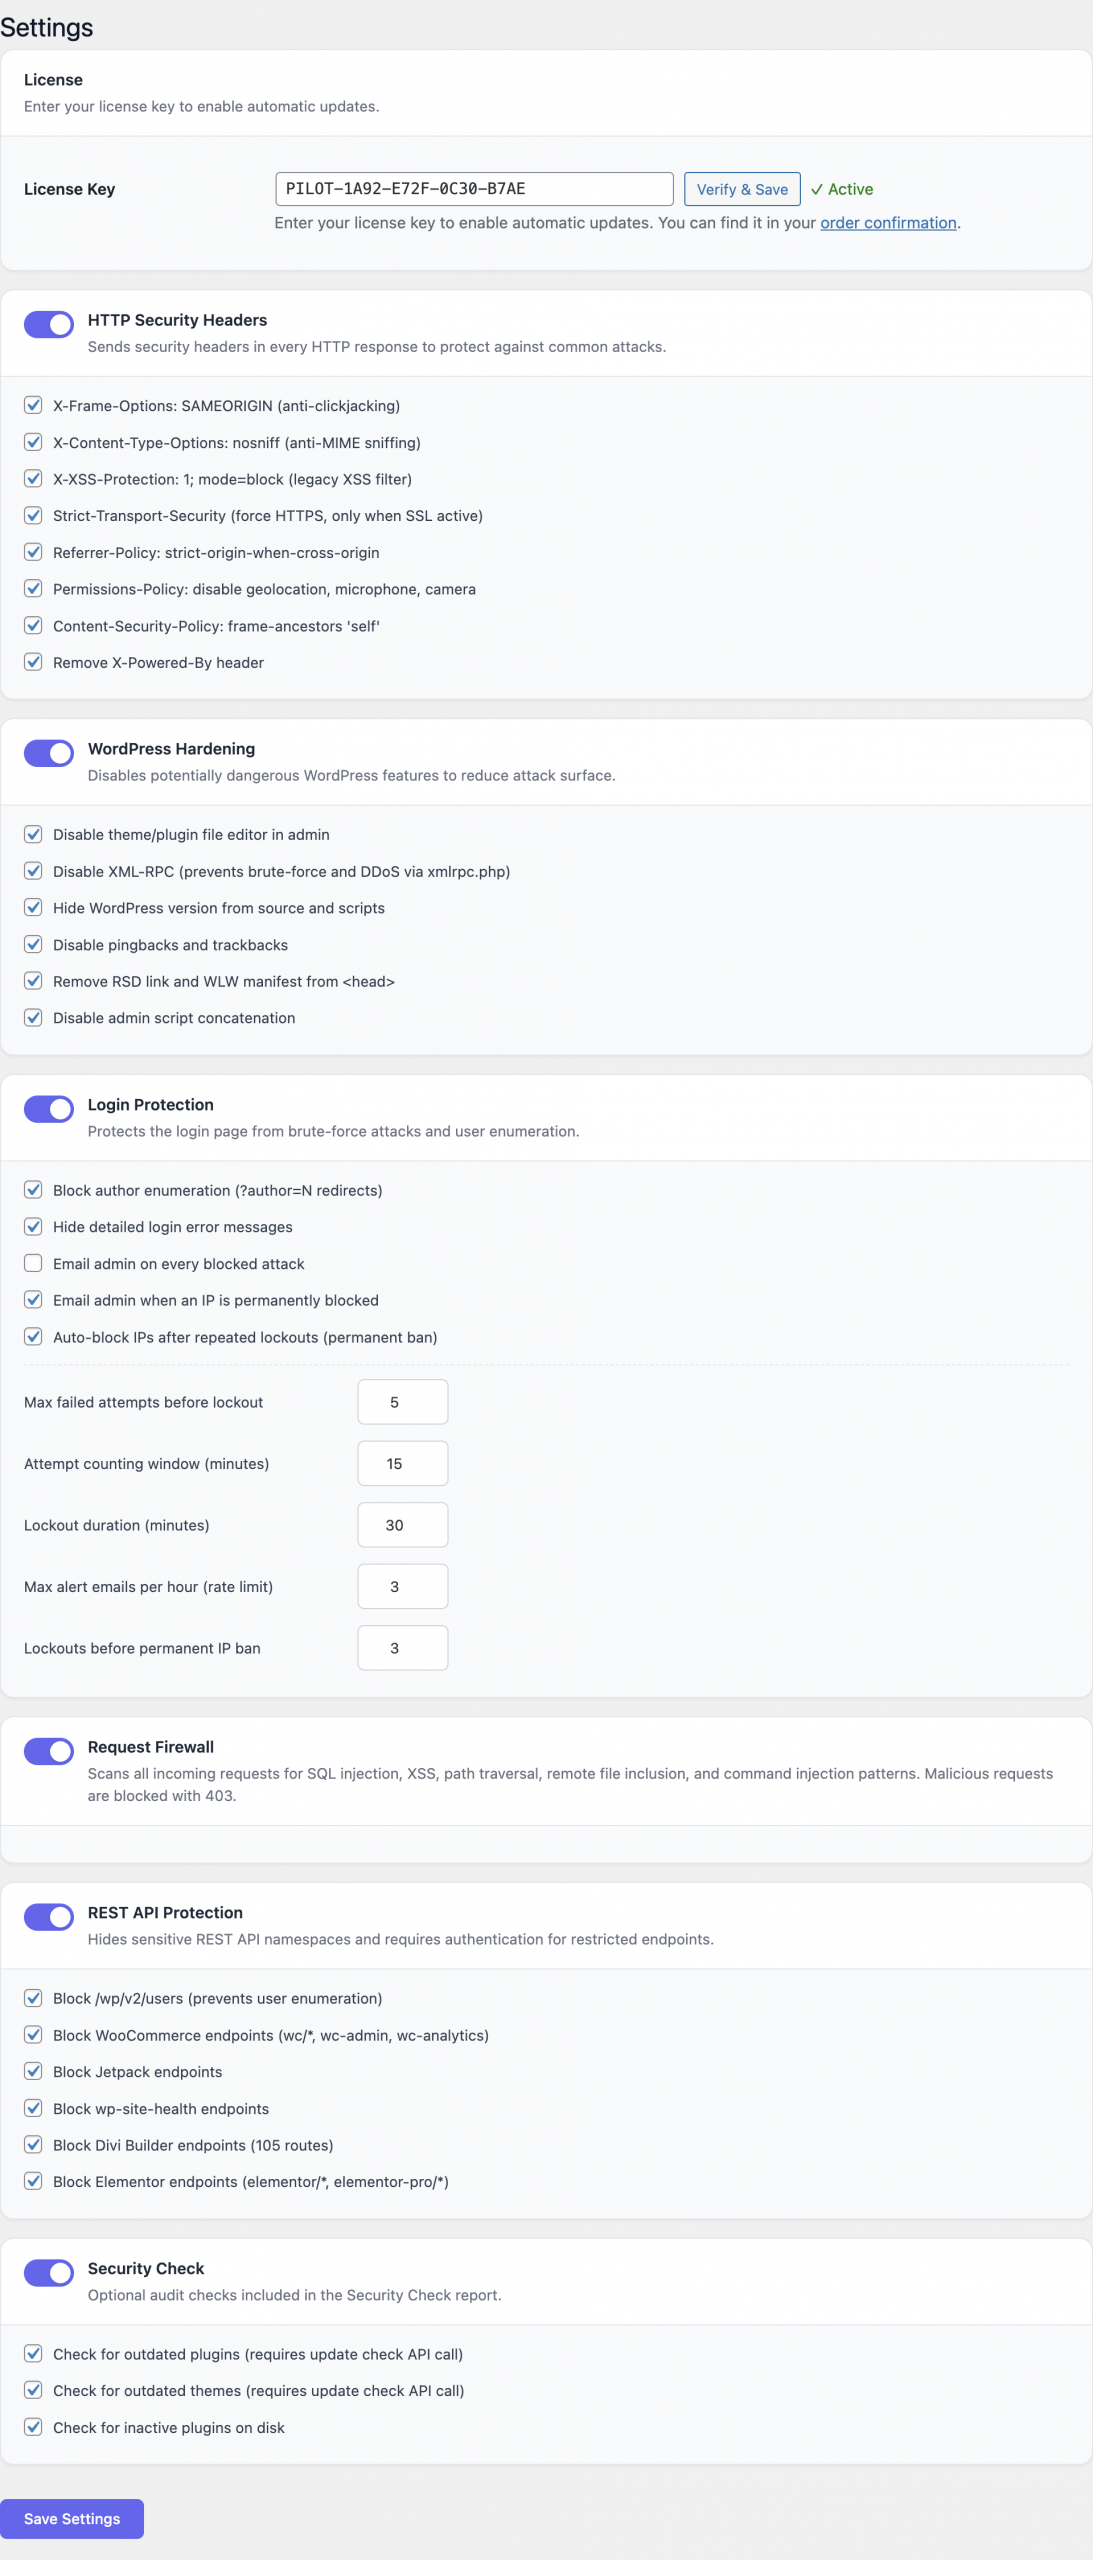
All configuration is performed from Settings → Security Pilot. The page groups settings into modules. Each module can be enabled or disabled independently, and most modules expose a small number of options.
HTTP Security Headers
The headers module adds standards-based HTTP response headers to every request served through WordPress. Toggle individual headers on or off according to your site’s needs.
| Header | Default value | Purpose |
|---|---|---|
X-Frame-Options | SAMEORIGIN | Prevents clickjacking by blocking the page from being embedded in third-party frames. |
X-Content-Type-Options | nosniff | Stops browsers from guessing content types, mitigating MIME-confusion attacks. |
X-XSS-Protection | 1; mode=block | Legacy XSS filter for older browsers. |
Strict-Transport-Security | enabled with sensible defaults | Forces browsers to use HTTPS for future visits. Enable only when the site is fully HTTPS. |
Referrer-Policy | strict-origin-when-cross-origin | Limits the referrer information leaked to third parties. |
Permissions-Policy | restrictive defaults | Disables sensitive browser features (camera, microphone, geolocation, etc.) that the site does not use. |
Content-Security-Policy | configurable | Restricts the origins from which scripts, styles, images and other resources may load. |
X-Powered-By | removed | Hides the X-Powered-By value generated by PHP or other components that would otherwise advertise your server stack. |
A few notes when configuring headers:
- HSTS is permanent in browsers once received. Verify HTTPS works
everywhere — including
wwwand any subdomains you plan to include — before enabling it. - The Content-Security-Policy is the most powerful and the most intrusive header. Start with the report-friendly defaults, then tighten the policy after checking the browser console for blocked resources on your real pages.
- If your site sits behind a CDN or reverse proxy that rewrites headers, make sure those edges pass the values added by Security Pilot through unchanged.
Login Protection
Login Protection counts failed authentication attempts per IP address and applies a lockout when a threshold is reached. After a configurable number of lockouts, the IP can be permanently banned.
Available settings:
- Max failed attempts — number of failed logins from an IP
before a lockout is triggered. Accepts values from
1to20. The default of5is a sensible starting point. - Attempt window — the rolling time window, in minutes, used
to count failures. Accepts values from
1to120. - Lockout duration — how long a locked-out IP stays blocked,
in minutes. Accepts values from
1to1440(24 hours). - Permanent ban threshold — number of separate lockouts an IP
can accumulate before it is banned permanently. Accepts values
from
1to20. - Email alerts — when enabled, the site administrator receives an email each time an attack is detected and each time an IP is added to the blocklist.
- Hide detailed error messages — generic error messages (“invalid credentials”) replace WordPress’s default messages, preventing attackers from learning whether a username exists.
The protection applies to both wp-login.php and the standard
XML-RPC authentication endpoint when XML-RPC remains enabled.
Request Firewall
The Request Firewall inspects incoming requests for malicious
patterns and returns a 403 Forbidden response when one is found.
The detection patterns are built in and cover:
- SQL injection — common payloads against query parameters, POST bodies and cookies.
- Cross-site scripting (XSS) — reflected and stored attack signatures.
- Path traversal —
../style attempts to escape the document root. - Remote file inclusion (RFI) — references to external URLs in contexts where local paths are expected.
- Command injection — shell metacharacters in parameters that
are likely to reach
system-style functions.
The firewall has no per-rule configuration. It is either enabled or disabled. Blocked requests are recorded in the attack log described below, including the offending parameter and the rule that triggered the block.
REST API Protection
WordPress exposes a large REST API by default, including endpoints that are useful for site builders but often unnecessary on a production site. Security Pilot can block unauthenticated access to entire endpoint groups while leaving the rest of the API intact.
Protected groups:
/wp/v2/users— user enumeration via the core users endpoint.- WooCommerce — store, order and customer endpoints exposed by WooCommerce when installed.
- Jetpack — Jetpack’s own REST namespace.
wp-site-health— health-check endpoints that may leak information about the environment.- Divi Builder — Divi’s REST endpoints.
- Elementor — Elementor’s REST endpoints.
Enable protection only for the groups you do not need. For example, a site that does not run WooCommerce can safely lock down the WooCommerce endpoints. The plugin checks authentication on each request and returns an authorization error for unauthenticated callers attempting to access a protected group.
WordPress Hardening
The hardening module switches off WordPress features that are frequently abused or that disclose information attackers can use to plan an exploit. Each option is independent.
- Disable file editor — turns off the in-dashboard theme and
plugin file editor (
DISALLOW_FILE_EDIT). An attacker who manages to obtain admin credentials can no longer modify code directly from the WordPress UI. - Disable XML-RPC — blocks the
xmlrpc.phpendpoint, which is a common target for brute-force and amplification attacks. Only disable XML-RPC if no integration on your site relies on it. - Disable pingbacks and trackbacks — closes a long-standing amplification vector that has been used in DDoS campaigns.
- Hide WordPress version — removes the
generatormeta tag and version query parameters from enqueued assets so the installed WordPress version is not advertised in the page source. - Remove RSD link — drops the Really Simple Discovery link used by external publishing clients.
- Remove WLW manifest — removes the Windows Live Writer manifest link that is rarely useful today.
For most production sites it is safe to enable all hardening options. Disabling the file editor and XML-RPC, in particular, is considered a baseline recommendation by the WordPress security community.
Security Audit
The Security Audit module performs a one-click review of your installation and lists:
- Plugins with available updates.
- Themes with available updates.
- Inactive plugins that remain installed and can still be loaded by an attacker who reaches the filesystem.
The audit produces actionable recommendations — for example, update a specific plugin or delete an inactive one — that can be addressed directly from the WordPress admin.
Usage
A practical first pass through the plugin looks like this.
- Install and activate Security Pilot.
- Open Settings → Security Pilot.
- Enable HTTP Security Headers with the recommended defaults. Visit a few pages of your site and check the browser console for unexpected Content-Security-Policy violations.
- Enable Login Protection. Leave Max failed attempts at
5, choose a 15-minute attempt window and a 60-minute lockout for a typical site. Turn on email alerts so you find out when the site is attacked. - Enable the Request Firewall. No further configuration is required.
- Toggle REST API Protection for the endpoint groups your
site does not use publicly. The
/wp/v2/usersgroup is almost always safe to lock down. - Enable WordPress Hardening options. At a minimum, disable the file editor and XML-RPC on production sites.
- Run a Security Audit and act on the recommendations (update or delete the listed plugins and themes).
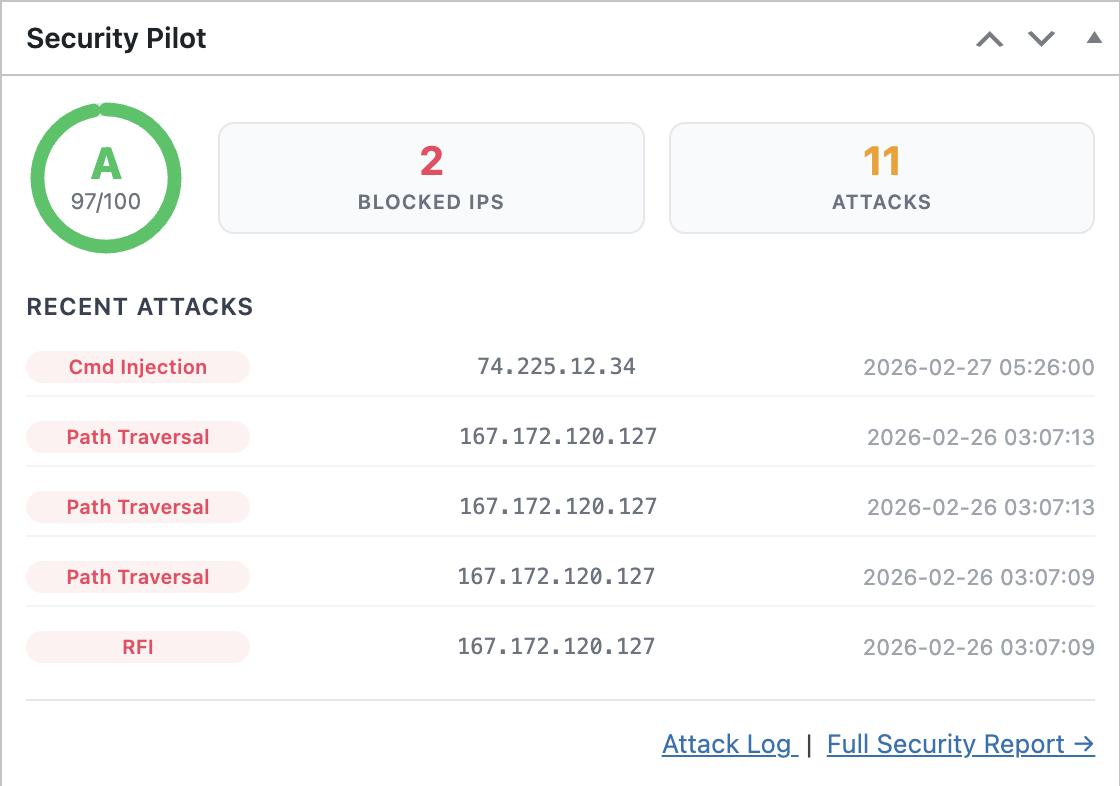
After this initial pass, return to the dashboard periodically to review the attack log and the blocked IP list.
Reviewing blocked IPs
The Blocked IPs screen lists every address currently blocked by Login Protection or by the firewall. Each entry shows the IP, the reason for the block, the time it was added and a control to remove the block manually.
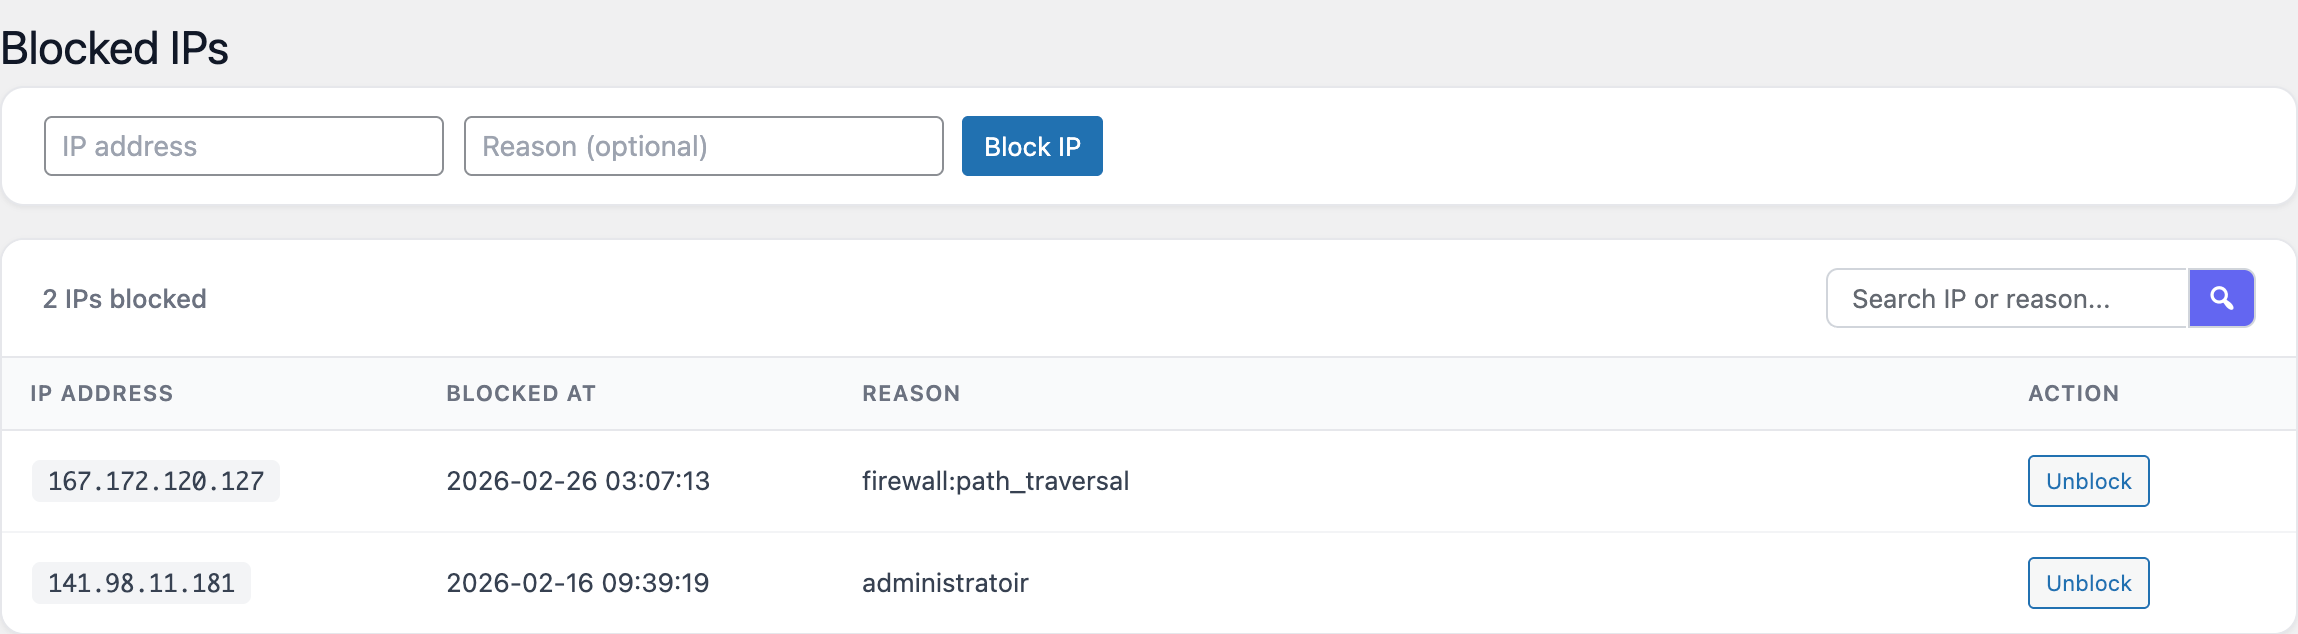
Use this screen to:
- Unblock an address that was caught by a legitimate user fat-fingering their password.
- Whitelist a known-good IP (your office, monitoring service, staging server) so it cannot be locked out by accident.
Reviewing the attack log
The Attack Log records every blocked request, including brute-force lockouts, firewall hits and REST API denials. Each row contains the timestamp, source IP, request method and URL, and the rule or module that issued the block.
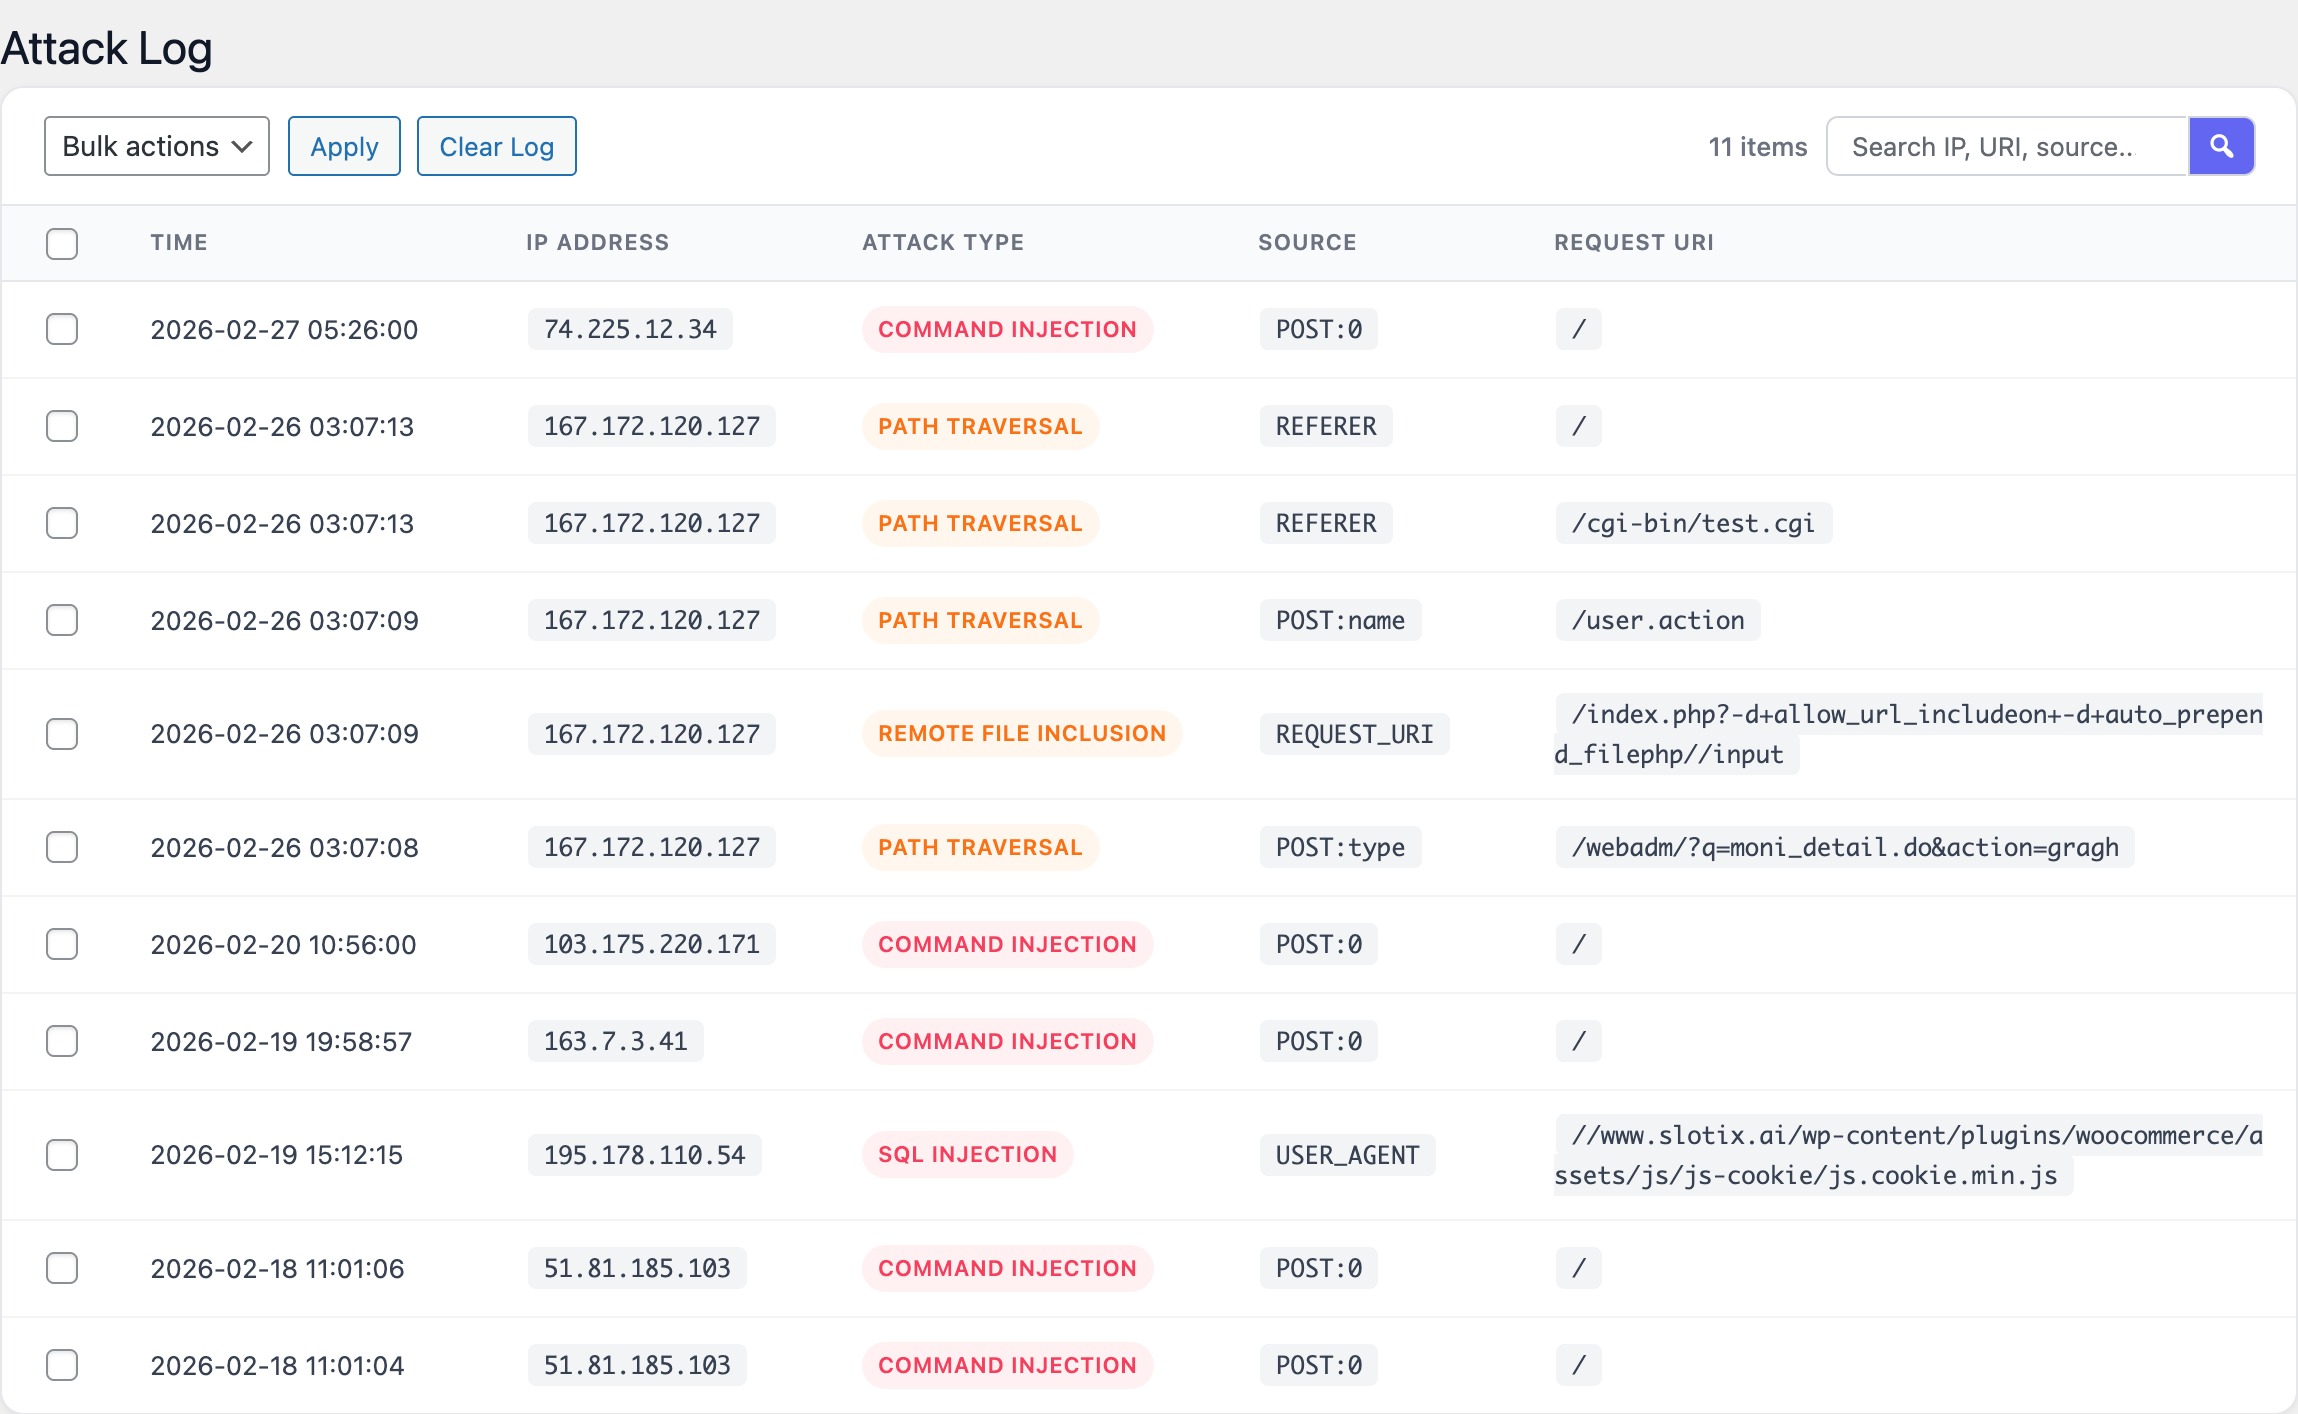
The log is useful both for post-incident review and for tuning the firewall: if a legitimate request to your site appears in the log, you can identify which rule was responsible and decide whether to whitelist the request or refine the rule.
Screenshots
The screenshots below illustrate the main areas of the plugin’s admin interface.
FAQ
Does Security Pilot replace other security plugins?
For most sites, yes. Security Pilot covers HTTP headers, login protection, request filtering, REST API restrictions, hardening and auditing. It is intentionally lightweight rather than a “swiss-army” suite. Running it alongside another firewall or login-protection plugin is technically possible but rarely useful and can cause overlapping rules to fire twice.
Will the headers break my site?
The default values are conservative. The two headers that most often need attention are HSTS and Content-Security-Policy.
- Enable HSTS only after your site is fully reachable over HTTPS, including any subdomains you want covered. The header is cached by browsers and cannot be easily revoked.
- Tune the Content-Security-Policy after watching the browser console for blocked resources on real pages. Custom scripts, fonts and analytics often need to be added to the policy.
Will the request firewall block legitimate traffic?
The detection patterns target known attack signatures and tend to be specific. If a legitimate request is blocked, it will appear in the attack log with the rule that triggered the block. You can then unblock the IP and, if the pattern is genuinely unavoidable, document the exception for your team.
Does the plugin work behind a CDN or reverse proxy?
Yes. The plugin reads the originating IP address from the
standard request headers and can correctly identify visitors
behind a CDN, provided your hosting environment forwards the
correct X-Forwarded-For or equivalent header. Make sure any
edge layer in front of WordPress does not strip the response
headers added by Security Pilot.
Can I export attack logs or blocked IP lists?
The attack log and blocked IP table are stored in your WordPress database and can be reviewed directly from the admin interface. For long-term archival or off-site analysis, take a database backup as you would for any other WordPress data.
Does disabling XML-RPC break anything?
XML-RPC is used by the legacy Windows Live Writer client, the WordPress mobile apps in certain configurations and a small number of third-party integrations. If you are not using any of these, disabling XML-RPC is one of the most effective single-click hardening steps you can take.
Are settings preserved when the plugin is deactivated?
Yes. Deactivating Security Pilot keeps your configuration, attack log and blocklist in the database so that re-activating the plugin restores the previous state.
Troubleshooting
A legitimate user is locked out
Open Blocked IPs, locate the entry for the affected address and remove the block. If the same user is repeatedly locked out, consider:
- Increasing Max failed attempts for forgetful users.
- Adding the user’s IP (or the office NAT IP) to the allowlist.
- Asking the user to reset their password instead of guessing.
Browser blocks resources after enabling CSP
The Content-Security-Policy is intentionally strict by default. Open the browser developer tools and look at the Console tab — the browser will report each blocked resource along with the directive that rejected it. Adjust the CSP to include the trusted origins (CDN, analytics provider, font host) that your site relies on.
Pages keep loading over HTTP after enabling HSTS
HSTS is honoured only after the browser has seen the header at
least once over HTTPS. Visit the site directly over https://
to prime the cache. If the site is not yet reachable over HTTPS
for every URL you advertise, disable HSTS until the migration
is complete.
REST API integrations stop working
If an integration that relies on a protected endpoint group stops working, temporarily disable protection for that group under REST API Protection and confirm the integration authenticates correctly. Many integrations expect to be called as an authenticated WordPress user; authenticated requests are not blocked by this module.
Headers are not present in the response
Some hosts or reverse proxies strip or override response
headers added by PHP. Verify the headers with a tool such as
curl -I https://example.com/ or your browser’s network
inspector. If a header is missing, check the host’s documentation
for how to allow custom headers to pass through, or add the
header at the edge if the host requires it.
Email alerts are not arriving
Email alerts use WordPress’s wp_mail() function. If no email
arrives, the issue is almost always with the site’s mail
configuration rather than with Security Pilot. Install a
transactional mail plugin (for example, a plugin that routes
WordPress mail through SMTP) and re-test by triggering a
lockout from a test browser.